Creating your first session
- Julio Rios (Unlicensed)
- wbanghart@brandonassociates.com (Unlicensed)
If this is a new installation of QWS3270 Secure and you have never created a session before, you will see the 'New Session Wizard' when starting the application. This wizard will help you get up and running quickly. Just follow a few easy steps to create your first session. To access the New Session wizard at any time simply select it from the QWS3270 menu.
Before you are able to create your first session there are three requirements:
- a TCP/IP connection to the Internet;
- the host name or IP address of the computer to which you wish to connect; and
- the port number for that host.
If you can use a browser to view web pages or if you can send and receive email, then you probably have an Internet connection. The host name or IP address and the port number can be obtained from a systems administrator of the server to which you wish to connect. If you already have this information then let’s get started.
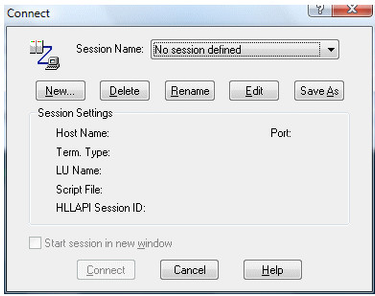
Assuming you have already started the QWS3270 Secure application, click on the QWS3270 menu, select ‘Connect’. The ‘Connect’ dialog (see below) will appear where you can select from a list of sessions that you can connect to. You probably don’t have a session yet so let’s define one. Click the ‘New…’ button and enter a name for your session. This name should be descriptive so that you will remember what this session is supposed to do. Once you have entered the name click the OK button:
The next dialog has many options. Don’t let this intimidate you. For now we will only fill in the most basic options:
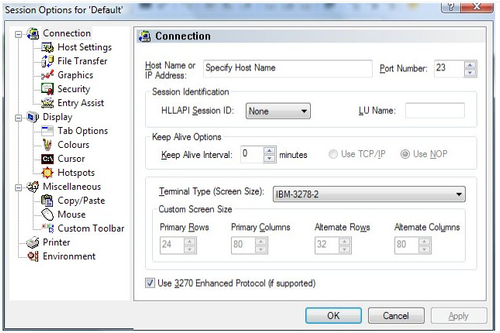
The only information that you require for now is the host name and port of the host you are trying to connect to. You need to get this information from the administrator of that system:
Hostname - A host or domain name locates an organization or other entity on the Internet. An example of a host name would be locis.loc.gov. The name is a representation of the IP address of the host in a form that is simpler and easier to remember than the IP address itself, and is translated to an IP address using the Domain Name System (DNS). or IP address In the most widely installed level of the Internet Protocol (IP) today, an IP address is a 32-bit number that identifies each sender or receiver of information that is sent in packets across the Internet. An IP address has two parts: the identifier of a particular network on the Internet and an identifier of the particular device (which can be a server or a workstation) within that network. On the Internet itself - that is, between the router that move packets from one point to another along the route - only the network part of the address is looked at. of the server to which you wish to connect. Enter this information in the ‘Host Name’ field.
Port - a port is a "logical connection place" and specifically, using the Internet's protocol, TCP/IP, the way a client program specifies a particular server program on a computer in a network. Higher-level applications that use TCP/IP such as the Web protocol, Hypertext Transfer Protocol, have ports with preassigned numbers. Other application processes are given port numbers dynamically for each connection. Port numbers are from 0 to 65536. Ports 0 to 1024 are reserved for use by certain privileged services. For the Telnet service, port 23 is defined as the default. is normally 23 for telnet Telnet is a text-based way of connecting to other computers and networks. It is one of the oldest forms of the Internet. When you telnet to another computer, it is like you are using a terminal of that system. Telnet operates in a client/server environment in which the computer you are using is the Client negotiates opening a session on another computer (the remote host or Server). . You can probably leave the default port value unless your systems administrator has told you otherwise.
That’s all you need for now. Click on OK to return to the ‘Connect’ dialog. Then click on ‘Connect’. After a few seconds you should see a login screen of the remote server.
Testing your connection:
If anything goes wrong, examine the QWS3270 Secure screen carefully for error messages. A common message is ‘Could not connect to host …’. What this could mean is that the host name or the IP address you provided is incorrect. Another possibility is that the port should be something other than 23. Check these settings as they are the most likely cause of the error.
If the connection to the remote server fails, try to connect to a different host. This will tell you whether the problem is with the host or your internet connection. If you don't have any other hosts, you can try our test site. First, create a new session and give it the name "Test Connection". Then set the hostname to "jollygiant.brandonsystems.com" (without the quotes). In the options dialog, click on the 'Security' tab, and remove the check mark from the 'Enable SSL Connection' box. Make sure the port is set to 23, and leave all other settings at their defaults and simply click OK. Select this session in the 'Connect' dialog and click Connect.
If this test works, then there is a problem with the host you are trying to connect to. You will need to contact an administrator of that server to either give you the correct hostname and port# or set you up with a user login.